





3480✽
Hello,
These are fleece jackets that I embroidered for my (3) grandchildren. I made patches using school designs, and attached them to the jackets with Fuse-n-Bond Applique & Patch backing. I didn't embroider directly on the jackets because I was afraid I wouldn't get the designs placed evenly. I worked so hard with placing, measuring , taping, repositioning and repeating that drill to get it right, and after pressing the patches on they were not even. Cut the edges as close as I could. I am very disappointed. But here they are. What do you guys use for even placement of designs?
6 images:
[1]

[2]

[3]

[4]

[5]

[6]

Comments (19)

2822✽
by
marianamin2003
27 Aug 2015
+10✽
Great job on the applique and placement on the jackets!

109885✽
by
crafter2243
27 Aug 2015
+9✽
I think you did a great job in placing. I have no answers since so far I had no need to do that.I am so sure the grands will love them.
78119✽
Your grandchildren will be thrilled to wear their jackets!
Hugs, Lidia
Hugs, Lidia
24331✽
21044✽

11700✽
As has already been said, they all look good. I think you have done a great job & can't imagine you will have any complaints from the grands.

145791✽
Works for me!. I think they look great. Me thinks you are to critical of yourself/Lillian

51302✽
by
designgirl
27 Aug 2015
+5✽
Your grands will love them. You did a beautiful job on the designs and the placement. I love them, Hugs Lynn
66927✽
by
graceandham
27 Aug 2015
+5✽
These are so attractive. My grandmother always said, "You'll never see it on a trotting horse."
5✽
Ok, this is what I want to do ... where do you get the Fuse-n-Bond Applique & Patch backing. I've tried several things, they sort of worked.. but this looks good you did a great job...
How come I've not heard of this backing... Anybody want to do a tutorial on this so we can all learn..
Thanks for posting
How come I've not heard of this backing... Anybody want to do a tutorial on this so we can all learn..
Thanks for posting
2 comments
Joann's usually carries it.
Trayne didn't have a comment box so I am answering her question here. I purchased the Fuse n Bond Applique & Patch backing from Allstitch Embroidery Supplies,(size 11and 3/4"X 5 yds) however, Floriani Embroidery Sewing and quilting Products is the company that makes it. If you go to their site you can read all of the information. I don't know how to attach a website for you. I really like the product and It really does adhere securely without having to sew it. I have problems sewing the appliques on so I was very happy to find this product.
9754✽
I think they look great, and I'm sure that your grands will love them. No need to be perfect with this sort of thing... once the kids get them on, they will be in constant motion! --Sharon

158720✽
They truly look fine. Your designs are adorable.
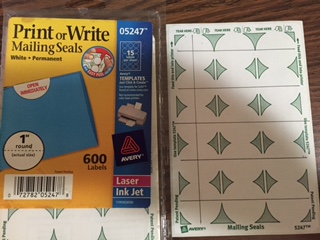
This tip was given to me by the lady who taught classes on my machine when I first purchased it. Use a 6"x24" ruler and lay it across the garment touching the place where the sleeve attaches to the jacket at the bottom (underneath the arm) from side to side. 6x24 works from newborn up to XXL. Take 1/2 of measurement to get the center. Use another ruler (mine is 6x6) and place the bottom edge of it butted up to the 1/2 measurement. (Say the 1/2 measurement you got was 11" then the 0" on the 6x6 ruler would lie along the 5 1/2" mark which is 1/2 of 11") Then depending on the size of the garment somewhere around 2-6" will center the design on one side. Measure down from the shoulder seam according to the size of the garment. On a child's jacket it's probably around 3- 4 1/2"? When you place the second ruler, if it doesn't run straight with any zipper or placket that is on the front of the shirt, move it so that it does. The eye will follow the zipper or placket and look for straightness. Put a target sticker right where you want the center of the design to fall. If your program allows, you can pin a printed version of the design and use that. I use round mailing stickers with crossed X on them that I draw.
I hope some of this makes sense.
This tip was given to me by the lady who taught classes on my machine when I first purchased it. Use a 6"x24" ruler and lay it across the garment touching the place where the sleeve attaches to the jacket at the bottom (underneath the arm) from side to side. 6x24 works from newborn up to XXL. Take 1/2 of measurement to get the center. Use another ruler (mine is 6x6) and place the bottom edge of it butted up to the 1/2 measurement. (Say the 1/2 measurement you got was 11" then the 0" on the 6x6 ruler would lie along the 5 1/2" mark which is 1/2 of 11") Then depending on the size of the garment somewhere around 2-6" will center the design on one side. Measure down from the shoulder seam according to the size of the garment. On a child's jacket it's probably around 3- 4 1/2"? When you place the second ruler, if it doesn't run straight with any zipper or placket that is on the front of the shirt, move it so that it does. The eye will follow the zipper or placket and look for straightness. Put a target sticker right where you want the center of the design to fall. If your program allows, you can pin a printed version of the design and use that. I use round mailing stickers with crossed X on them that I draw.
I hope some of this makes sense.
1877✽

299706✽
very nicely done, as for me when I do tee's I use the sleeve measurement (from top of armpit to bottom of armpit) & divide by 2 then to get the center of where I want the middle of my design to be I measure from the center of that to the zipper & divide by 2. I hope that this makes sense to you. ~hugs~
1 comment
Thanks and thank you for the information. I will try it.
33641✽
I've learned to live with my inability to get things exactly where I want them. Fabric moves, stretches, and has bias. Some people do a really good job of it and give great info, but I must be a clutz.

360672✽
66028✽
3480✽
Thanks to everyone for your comments and encourageing words. I admit I am more critical on myself than I need to be. My oldest daughter always tell me the same thing.
23577✽