







7806✽
Hi there all! So here is what I tried yesterday. ....actually digitizing a design!
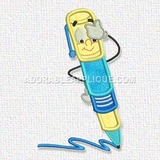
Well I have 2 stitchouts here....1 on the right is my 1st attempt (also pic 2) which had quite afew flaws in it! Then the stitchout on the left is my 2nd attempt (also pic 1) after making some changes :)
Well it sure did make a difference but still theres room for improvement (because I am still a learner).......hopefully on my next design!
Suggestions are always welcome :)
3 images:
[1]

[2]

[3]

Comments (18)
11867✽
1503✽
21044✽

234573✽
I think they look great Fatima. I hope the digitisers on here will help you out if you want to learn more. Love Chris
1 comment
Yes I definitely want to learn more ......I am enjoying this!
Thank you so much Chris :)
Thank you so much Chris :)

30988✽
Well they look great to me. i only have time for sewing.
Hugs Pam.
Hugs Pam.
1 comment
Thanks a lot Pam :)
24331✽

145791✽
Oh Sandra I think you are doing marvelously. Great job!/Lillian
1 comment
Thanks a lot Lillian :)....my name is Fatma dear!

261163✽
by
basketkase
22 Sep 2015
+7✽
I surely couldn't suggest anything more.......the one on the right is crisper and I don't see any flaws, great digitizing........you are learning the same way I did......trial & error.........very nice work........
1 comment
Thank you so much Vicki :)
Good to know you learnt the same way! Hope to get better with practice and trial n error :)
Good to know you learnt the same way! Hope to get better with practice and trial n error :)
31625✽
These stitch outs look very nice. I think I see see what you mean. Not that I know much at all about digitizing, but I can see the elements are more uniform in size in your 2nd stitch out. This is a great way to learn - by doing and adjusting what you think needs tweaked. You can see how each change effects the end result. You are learning quickly and doing a terrific job. Keep going!
1 comment
Very true I think learning this way gives you more knowledge of what changes can make a difference! Thank you so much for appreciating :)

169064✽
I'm glad you keep trying. You are definitely getting better. Not all of us are meant to be digitizers. Thank goodness or who would be there to buy designs. So keep developing this talent. You get better with each trial and with each design.
1 comment
Thank you so much Karen :)
I am glad I gave digitizing a try and wish to learn as much possible or I can say as much I am capable of doing!
Its fun to be able to design stuff according to our own wish :)
I am glad I gave digitizing a try and wish to learn as much possible or I can say as much I am capable of doing!
Its fun to be able to design stuff according to our own wish :)
23577✽

299706✽
wow Good for you! This is wonderful~hugs~
1 comment
Thank you so much :)
18550✽
I am not a digitizer but a wanna be but no effort put in to it. The one on the left looks larger, the one on the right the black area is more revealed---But--I think they both look great.
1 comment
Yes you are right the one on the left is fuller as it has stitches running around all the segments of the design!
Where as in the one on the right its not there and hence you see more of the back fabric! :) thanks a lot dear!
Where as in the one on the right its not there and hence you see more of the back fabric! :) thanks a lot dear!

360672✽
Looks excellent from Canada lol hugs
1 comment
Thank you so much Carolyn :)
33641✽
Nice bold designs! For some reason the white thread looks fuzzier than the others. Is it the same thread, or do I need to get my glasses on?
2 comments
You are correct my dear and you dont need your glasses haha :)
In a hurry I picked and used a not so good white thread and it does look fuzzy after stitching out! Didn't matter much to me as it was just a test stitchout :)
Thanks for looking!
In a hurry I picked and used a not so good white thread and it does look fuzzy after stitching out! Didn't matter much to me as it was just a test stitchout :)
Thanks for looking!
Thanks for explaining!
66028✽

145307✽
Well done for a first try at fill and column stitches.
I think you used columns for the outer shapes and a fill stitch for the inner, but I can't see very clearly what you did. Anyhow, here are two general tips that might be useful.
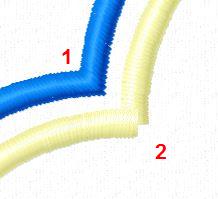
1. don't start a column at the tops (or valleys) but in the middle of a straight stretch or slight curve. picture 1 shows the difference. The pale yellow one is started at the valley, the blue one in the middle of the curve.
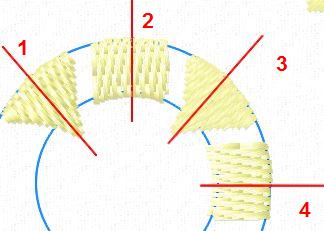
2. Try to vary the angle of your fill stitches - see picture 2. The light on the stitches will give very nice effects which make any design more interesting than having all stitches at 5 degrees. And the push-pull effect will be lessened as well.
When you use copy, paste and rotate (or auto-repeat in a circle) that happens automatically.
I think you used columns for the outer shapes and a fill stitch for the inner, but I can't see very clearly what you did. Anyhow, here are two general tips that might be useful.
1. don't start a column at the tops (or valleys) but in the middle of a straight stretch or slight curve. picture 1 shows the difference. The pale yellow one is started at the valley, the blue one in the middle of the curve.
2. Try to vary the angle of your fill stitches - see picture 2. The light on the stitches will give very nice effects which make any design more interesting than having all stitches at 5 degrees. And the push-pull effect will be lessened as well.
When you use copy, paste and rotate (or auto-repeat in a circle) that happens automatically.
4 comments
Thank you so much Martine :)
How kind of you to spare your time and explain this to me!
I did use columns for the outer most section.....n yes the inner shapes have the standard fill!
I would keep in mind what you told me about the valley :)
And also try collumns on the inner design!
Thanks a lot once again dear.....will update my progress!
How kind of you to spare your time and explain this to me!
I did use columns for the outer most section.....n yes the inner shapes have the standard fill!
I would keep in mind what you told me about the valley :)
And also try collumns on the inner design!
Thanks a lot once again dear.....will update my progress!
Oops I misunderstood a little part...but now its clear!
About the fill stitch you suggested I change the angles or inclinations....I didn't know we could do that but just learnt it from you and tried it out! Thank you so much :)
About the fill stitch you suggested I change the angles or inclinations....I didn't know we could do that but just learnt it from you and tried it out! Thank you so much :)
Thanks from me too Martine!
Glad I could be of help.
78119✽
Nice try, Fatma! You had the best advice here.
Hugs, Lidia
Hugs, Lidia
4 comments
Thanks a lot Lidia :).....I want to try frames like you make....any tips on doing those?
What digitising project do you use? It's a bit different in different software programmes but what you do is make an appliqué in the desired shape, split it into layers so you can get
1. a placement line (sometimes called die line)
2. a slight zigzag to fasten your fabric
after embroidering and adding the lining at the back, repeat #2, cut back the fabric top and bottom and stitch
3. the satin outline, make it 5 mm wide to get a nice edge.
In most software you can easily draw a rectangle and a circle in any size you want. Copy and paste the circle 3 times and place it on the corners of the rectangle to get your basic shape and go from there.
1. a placement line (sometimes called die line)
2. a slight zigzag to fasten your fabric
after embroidering and adding the lining at the back, repeat #2, cut back the fabric top and bottom and stitch
3. the satin outline, make it 5 mm wide to get a nice edge.
In most software you can easily draw a rectangle and a circle in any size you want. Copy and paste the circle 3 times and place it on the corners of the rectangle to get your basic shape and go from there.
Well nowadays I am working with master works.....I understand completely what you explained here :)
I thought so too applique might work here but just was wondering if it could be something else.....thanks for explaining once again Martine......you are such a sweet person! :)
I love the rope border Lidia has used afew times but I think that is there in embird exclusively?!
I thought so too applique might work here but just was wondering if it could be something else.....thanks for explaining once again Martine......you are such a sweet person! :)
I love the rope border Lidia has used afew times but I think that is there in embird exclusively?!
It might well be. I use Embird and 6D - the latter does not have it although you can digitise your own borders and add them to the program. Masterworks might offer that option too, but it is not a beginner's item.
I made tutorials for making frames, borders, new outlines and fill stitches in Embird some time ago, but that won't be of help for you.
I made tutorials for making frames, borders, new outlines and fill stitches in Embird some time ago, but that won't be of help for you.