




299709✽
I would like to say a big THANK YOU to Laura aka daily laundry & her hubby for making & sharing her idea for holding the Kam Snaps. I asked hubs to make me one too & he finished it for me last night, he added holes for the optional sizes & the screw driver so I won't loose them. It is so much easier on the hands this way. THANKS again Laura a great idea!
2 images:
[1]

[2]

Comments (14)

67271✽
Very handy item for the craft/sewing room
1 comment
thank you Bev, very much ~hugs~

96370✽
by
dailylaundry
03 Jan 2016
+16✽
Loralye - how very kind of you to remember I posted my KamSnap holder that my DH made me. That was ages ago!!! Thank you! BTW, your hubby did a great job - I like how the accessories have a "home"!!
1 comment
Laura thank you for posting yours. With my torn muscle I found it very difficult to use mine. I saved the picture some time ago & just recently remembered to send it hubs, he said not worries & here it is. What a handy holder & so much less strain on my wrist. Thanks again ~hugs~
18140✽
Nice job to your hubby! He knows how to keep his woman happy!
1 comment
thank you very much, & he is a wonderful hubs & is my whole world. ~hugs!~

360672✽
tell him i need one to lol way to go hubby J
1 comment
lol If we ever have tea I will tell him to get one ready for you, thanks ~hugs~
24331✽
by
sandralane
03 Jan 2016
+6✽
Great addition to your sewing/craft room. Dear hubs such a treasure . Sandra.
1 comment
Sandra yes he really is, thank you very much ~hugs~
10990✽
Very nice. Wonderful hubby to make this for you. Now you can attach lots of snaps.
1 comment
Yes indeed lol, thank you very much ~hugs~

234573✽
How wonderful to have such a handy husband. My Trev is an academic and couldn't do anything like this. Well done to him and to Laura for sharing this idea. Love Chris
1 comment
Chris mine is an engineer & when I read this to him he said give Trev a chance he may surprise you. You never know....~hugs~
45918✽
Glad your hubby made one for you. And your right it's easier on the hands, I can even use it with my one hand.
1 comment
Cuties share the best ideas & projects right! What a relief to use with out pain. Marian thank you very much ~hugs~

743363✽
it's great to have a handy HB, but perhaps stupid: what is it and what do you use this for I wonder?
3 comments
Not stupid! It is to hold Kam Snap pliers - they set plastic snaps and they are wonderful.
My apologies Gerry I should have explained this better. The KamSnaps are pliers that you squeeze really tightly to add the snaps to your projects. Rather like a fabric punch. By placing the pliers in the slot on this wooden platform the force is on the wood & not your wrist so it makes it much easier to use. You just put your snaps in place on the garment & press down, the base takes all the pressure & not your wrist. It works terrifically! ~hugs~
thank you for the explanation )))
318619✽
by
dragonflyer
03 Jan 2016
+2✽
Nice...good to have a handy guy around, too!
1 comment
Kim thank you very much & yes it is ~hugs~

173695✽
Excellent! Good work Hubby!
1 comment
Christine thank you very much ~hugs~

32948✽
by
jofrog2000
03 Jan 2016
+1✽
Looks handy. Would you be willing to let us know the sizes of the wood pieces and how to assemble? My DH could have whipped one up for me, but it's 13 years since he passed, so I do it myself, or not at all. My fingers would appreciate it.
Jo
Jo
1 comment
thanks Jo I will ask hubs for the information as soon as he returns & let you know what they are
299709✽
ok here goes...
bottom piece is 1x4 & is 8inches long ( In Canada that means it is really 3.5 wide)
next piece on top of that...well there are really 3 pieces that sit on top of the bottom piece
2 of them measure 1x2 x3.5 this will sit lengthwise on the base
the third one sits in front of the pieces mentioned above & has a small half circle hole cut in it & it measures .5" thick x1.5" x 3.5" long
2 pieces that sit one on top of the other & they measure .5" thick x 1.5" x 3.5"long. This is the part the handle sits on
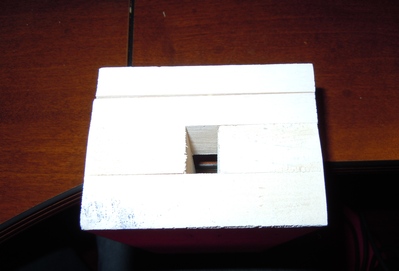
1st picture is the back view
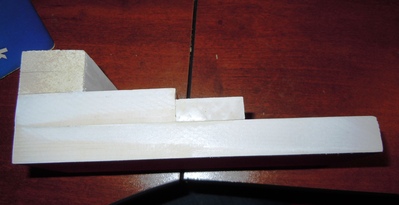
2cd picture is the side view
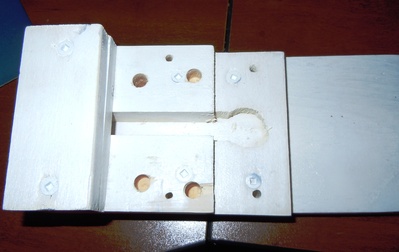
3rd picture is the top view I certainly hope that I have explained it well enough but if you need any help please ask away & I will ask hubs. He said if you were close enough he would make you one too
he added the holes after he put it all together but you can do it either way, just choose your drill bit to match the size of the extras that you have. I hope that you will post yours too
bottom piece is 1x4 & is 8inches long ( In Canada that means it is really 3.5 wide)
next piece on top of that...well there are really 3 pieces that sit on top of the bottom piece
2 of them measure 1x2 x3.5 this will sit lengthwise on the base
the third one sits in front of the pieces mentioned above & has a small half circle hole cut in it & it measures .5" thick x1.5" x 3.5" long
2 pieces that sit one on top of the other & they measure .5" thick x 1.5" x 3.5"long. This is the part the handle sits on
1st picture is the back view
2cd picture is the side view
3rd picture is the top view I certainly hope that I have explained it well enough but if you need any help please ask away & I will ask hubs. He said if you were close enough he would make you one too
he added the holes after he put it all together but you can do it either way, just choose your drill bit to match the size of the extras that you have. I hope that you will post yours too
2 comments
Thanks! It's going to be a while, it's REALLY cold out here in New Jersey, and I'm not venturing out to get materials. Jo
ok no worries as long as the directions are ok
16529✽
by
vickiannette
05 Jan 2016
+1✽
lucky lucky you. I may want one, but haven't yet purchased any Kams.
1 comment
they are terrific