





UPDATE below-Hi Cuties, Some of you were inquiring how I made these Coat Hanger Safes, so I put together some photos and a few instructions. Please read all through before starting your project. You only have 2 pattern pieces to this project, but you will cut only one pocket and two front and back. The front and back are the same HOWEVER you will trim off one and one quarter inch from the bottom edge, of one piece only. We will refer to it as the back and this will be the one your zipper is on, with the pocket.
#1 shows how I made my pattern and marked my center and where to stop sewing on each side top. The cutting size for pocket is WRONG if you can read my pattern. You will need to cut one 5 inch x about 19 1/2 or 20 inch may be better.
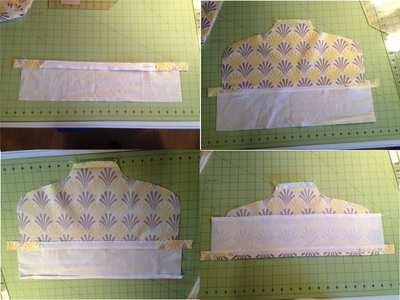
#2-shows zipper sewn to the pocket piece.*Not shown is how I sewed my tabs to lengthen my zipper because all I had were 14 inch zippers. I am sure you can YouTube to find out how if you don't already know.* The photo also shows the back (**remember to trim 1 1/4 inch off the back BEFORE inserting zipper**) with the zipper sewn on, right and wrong sides, and then with pocket flipped wrong sides together to back-PRESS
#3 photo on top left shows trimming to fit (Hey, I can't be exact!)
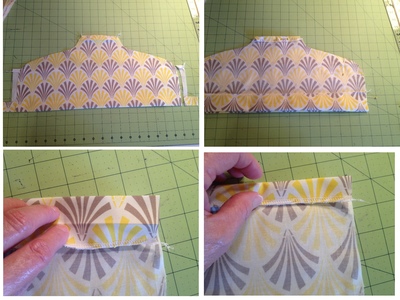
photo top right shows matching front to back-**before you hem if you want to embroider do so now, but read info at end** you will need to match and put a pin on each edge at hem on front only, taking it to iron and pressing that outer fold. I say outer fold, because the next 2 images on this photo show how to turn and press your hem folding in twice.
#4 top left-shows hem before sewing-top right shows hem sewn and how it now matches the back with pocket.
Bottom left shows project reverse of how it matches and sewn all around, stopping at marks as in image bottom right
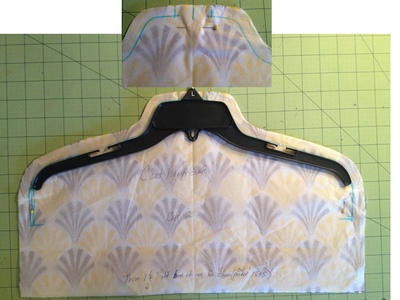
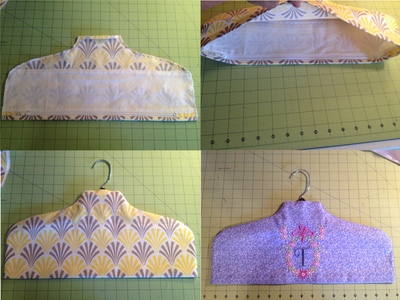
#5 top left shows how I pressed down about 1/2 inch at top where hanger inserts and edged finished around each side edge to top, with this fold down at top.
photo top right-turned right side out with pocket hidden inside!
bottom left-finished -pressed-hanger inserted
***bottom right-the blue shows embroidery on the front longer piece (*remember the back with pocket has 1 1/4 inch trimmed off*) decide how far you want your design to be from the top and bottom of this longer, from top to bottom, piece. I should have placed this 5x7 design about 5/8 inch higher, so I could have sewn my hem all the way across. I stopped at design, as to not sew over the flowers.
I embroidered before I pressed my hem folds, but I will wait next time, until I get them pressed. I will know exactly where I want my design to be, to not interfere with hem stitching.
As always I know a lot of you know how, but for those of you who don't, or need help, I hope that this has been helpful. If you need anything, just ask-Toogie
ps- I have made a pattern page in a pdf file. I have put the width size of my bottom edge 18 1/2 inch by 10 7/8 at center fold and drew my outer edges. If you are interested, I can send you my drawing, by email, BUT only give me your email address in a pm through INBOX at the top of this page. DO NOT post your email here, please. Thank you
Update-someone asked how to do the pocket-
For the pocket-
*1-Sew pocket on one zipper edge, sew back on other zipper edge.
2-Edge finish fabric and zipper edge together (so you don't get ravels caught when zipping-unzipping).
3-Edge finish other long edge of pocket and press under about 1/2 inch.
4-Press up, wrong side of pocket to wrong side of back . Stitch across the long side of pocket securing it to back. Trim any excess pocket at side curves of back.


Great job on them Toogie, I love all of the instructions and your 'safe' hanger. Love Chris


I was thinking, tell me if this is a good idea. If a person had a stained front shirt, couldn't you use the center sleeve length, to make the inset down the center front, on the makeover shirt? And if the stain was high enough, I wonder if the cowl neck scarf could be made from the lower front and back of stained shirt?


We have all our embroidery items we completed posted in Projects. But here in Community, there are more topics you click on to post. I'm sure you will find your way around and if you can't , just ask. Someone always has an answer. I hope you enjoy being a Cutie!-Toogie