




Community / Digitizing /
145305
by mops 10 Feb 2018 ( edited Feb 10'18 15:40 )
+20

Overlap in designs.

When you digitise openings in an object overlaps at some place are unavoidable. The number of them depends on several factors:
- the shape of the object
- the shape of the opening(s)
- start and end points of the object
- the stitch angle.
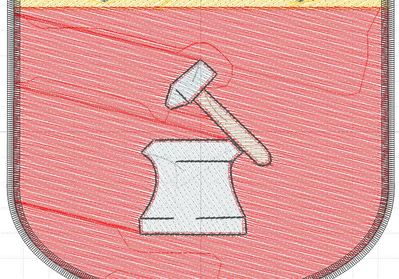
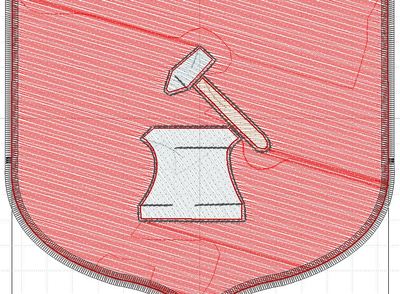
I chose an example of part of a crest I embroidered. The shape is simple, the openings are not. But even a circle would give 2 overlaps.
I varied the start and end points and the angle of the fill stitches.
- yellow start upper left end upper left angle 60
- pink start upper left end lower right angle 60
- green start upper left end upper right angle 30
- blue start upper left end lower right angle 30

In the end I chose a different angle (32) and let it stitch from upper left to lower right.

A good underlay helps prevent gaps, as does stabilising well and using basting stitches around the design.

2 images:
[1]
[2]
Comments (6)
145305
by mops 10 Feb 2018
+3
Another example of the effect of the fill stitch angle. The angles are -14 degrees and -16 degrees. You see the overlap due to the stitching path as thick stripes. Start and end points are the same. I spent a lot of time trying to get a minimum of overlaps in this part of the design.
26010
by elemausi 10 Feb 2018
+4
Thank you for explaining this.
1 comment
by mops 10 Feb 2018
Keine Ursache.
115778
by asterixsew 10 Feb 2018
+3
Yes thanks for the explanation and its very interesting
1 comment
by mops 10 Feb 2018
Thank you.
66927
by graceandham 10 Feb 2018
+2
Another Mops Master Digitizing Lesson. Thanks so much for helping us understand.
1 comment
by mops 10 Feb 2018
My pleasure.
14637
by kustomkuddle 10 Feb 2018
+2
Thank you for the lesson!
1 comment
by mops 10 Feb 2018
My pleasure.
261163
by basketkase 10 Feb 2018
+1
Love your tutorials.........
1 comment
by mops 10 Feb 2018
Thank you. I don't think you need them, but I love your comment.