




360672✽
Me again with another question,I been looking and reading trying to learn /find placement on how to do a doily for example.There is no one in my bush to help me and i would like to learn to do this properly.I was hoping for a utube video but I cannot find one . I learn best with pictures in step by step, not the written words .Any ideas anyone please???Thanks Carolyn
Comments (9)

66927✽
by
graceandham
26 Jan 2020
+5✽
You need the Cutie who does all the doilies for Sue Box. Is that lidiad maybe? Write and ask!
1 comment
ok good idea thanks:):)
11927✽
Also here is a you tube from embroidery library.https://www.youtube.com/watch?v=Vx6ll7gmKSs Hugs. Nan
2 comments
thanks will check it out
no that one just shows u how to do a ready made one I want to learn to piece say 6 pieces together to make a big doily

145307✽
Carolyn, I don't exactly know what you mean. Are you thinking of one piece of fabric and embroidering a design several times without outlines being out of alignment? Your machine manual should have some info about placement marks and how to use them. Can you show what you want to do or what the problem is?
2 comments
you might look on youTube for split embroidery designs - I noticed there are quite a few
will look under that , heading thanks I am looking for say a ruffly edge and turn it into a nice doily whatever shape? oblong , round etc. thanks i like pictures i learn best like that
11927✽
Is this one what you have in mind?https://www.emblibrary.com/EL/ELProjects/Projects.aspx?productid=PR1978
Also how about Shirlene? Seems she is the fsl queen. Hugs. Nan
Also how about Shirlene? Seems she is the fsl queen. Hugs. Nan
3 comments
No not like this one I will ask Shirlene thanks where did u go on that site to get to tutorials??
Under the EL logo, far right Projects, click on that and in the drop down there is Search Projects. I typed in freestanding lace doily.
No go with her either
33641✽
Most of the ones I've seen photos of either stitch them together with their sewing machine using a narrow zigzag or use a satin stitch.
1 comment
Yes i can do that just fine but it is the other i was hoping to learn thanks
11927✽
Guess I am not sure exactly what you are looking for. Can you give more details? Hugs. Nan
2 comments
if i had one part of a doily and i needed to make 6 more the same how would i do it???Need to get them even etc??
Copy and paste and join it all together?
360672✽
No help yet from all the suggestions :(:(But it is ok one day i will get it Thanks
78119✽
Hi Carolyn,
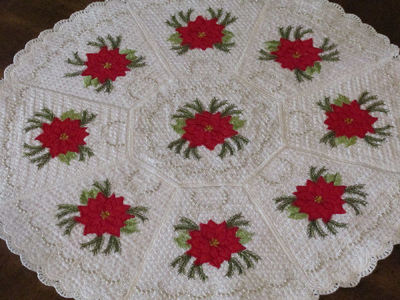
I know what you mean. In order to do that you must use a design that has been digitized with a border suitable for doilies, then you have to use your embroidery software (like Embird). In your software, open the design, duplicate it (6 or 8 times or more) in a circle. If the complete doily fits into your hoop, fine, otherwise reduce or add more times until it fits your hoop and you can stitch it out in one hooping. Years ago, when we all had small hoops, the digitizers used to offer designs of wedges of doilies that you could stitch out one piece at a time and then you could use the zig-zag of your machine to stitch all the vedges together and get a larger doily. You can still buy them if you want. Refer to the photo below. Hugs, Lidia
I know what you mean. In order to do that you must use a design that has been digitized with a border suitable for doilies, then you have to use your embroidery software (like Embird). In your software, open the design, duplicate it (6 or 8 times or more) in a circle. If the complete doily fits into your hoop, fine, otherwise reduce or add more times until it fits your hoop and you can stitch it out in one hooping. Years ago, when we all had small hoops, the digitizers used to offer designs of wedges of doilies that you could stitch out one piece at a time and then you could use the zig-zag of your machine to stitch all the vedges together and get a larger doily. You can still buy them if you want. Refer to the photo below. Hugs, Lidia
1 comment
yes i have done this type using Yorikos designs and got it right lol thanks
145307✽
Have you looked in your user's manual for your machine(s). In my manual for the Ruby they show you how to put 2 designs together, so you could sew the 'wedges' together without bother.
You can also print out the design and use that as a template. Use at least two templates (or more) and arrange those on your fabric making sure they connect correctly. Mark the axis-lines and the centre for each one - https://www.emblibrary.com/EL/ELProjects/Projects.aspx?productid=PR1820 might be helpful. Mark two, then rearrange the first one to get #3 marked, and so on.
No sewing together afterwards, just careful marking and hooping.
You can also print out the design and use that as a template. Use at least two templates (or more) and arrange those on your fabric making sure they connect correctly. Mark the axis-lines and the centre for each one - https://www.emblibrary.com/EL/ELProjects/Projects.aspx?productid=PR1820 might be helpful. Mark two, then rearrange the first one to get #3 marked, and so on.
No sewing together afterwards, just careful marking and hooping.
1 comment
I am starting to get this thanks:):)