




463487✽
One of those silly questions. What does "in the hoop" designs mean?
Comments (6)

145791✽
What ever u r doing is stitched totally n the hoop.<br />purse, key chain or watch fob, whatever u r making. It will all be done n the hoop. No ques is silly or nonsensical if u do not know it. *

12985✽
by
celticlady1031
06 Feb 2009
+5✽
In The Hoop or ITH designs are a complete project completely done in the hoop. A perfect example would be a towel topper. I happen to really like these projects.

2160✽
by
sandy38001
06 Feb 2009
+3✽
you got your answer...you need to try making a project this way, lots of fun. **

109885✽

11259✽
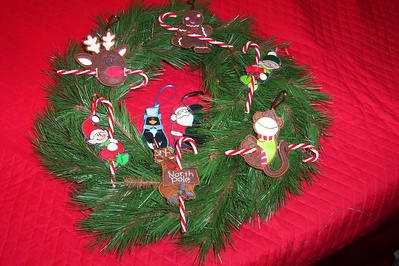
These are candy cane ornaments that were done "in the hoop"..fast and simple...Love these projects...

14995✽
you can do so many items in the hoop,
hoop but i will try to explain
In the hoop means as allready said an item made in the embroidery hoop that is used with an embroidery machine. the hoops come in several sizes according to your machine, these hoops can go from 2"x"2 up to a giga hoop but most hoops used for designs will be 4x4 5x7 7x10. ( not all machines do all sizes )
so lets look at what this entails
READ THE INSRUCTIONS
lets say you have purchased an in the hoop spectacle case. the first thing is you hoop up with iether a WSF or a Stitch and tear stabiliser this is almost like woven paper that carries your design on top of it, it is actually sewn to the item but can be ripped away when the item is finished. it holds the material in place as the hoop is moved around
ok we have hooped up your chosen stabalizer, and read all the instructions and cut the material needed start your machine,, it will sew out a placment line, you then place the first bit of fabric over this line and press go again
the fabric is sewn onto the stabiliser and then will stop, you may need to remove the hoop from the machine ( do not remove the fabric from the hoop) to cut away the excesse fabric from around the sewn line your instructions will need to be read as you go and each stage ticked off as you go if this is your first time... you may have to put on two layers of fabric at a time, one being the front and the other the linning,, just follow the instructions,
At one stage you may be asked to REMOVE THE HOOP FROM THE MACHINE DO ONLY THAT DO NOT REMOVE THE FABRIC FROM THE HOOP
now you need to place the linning and the back of the case UNDER THE HOOP i use childrens glue stick to hold the fabric in place, slide it back onto the machine and let the machine sew out its new oultline . this attaches the backing to the stabaliser,, again you may be asked to remove the hoop from the machine,, this time you will need to carefull remove the excesse materail from OUTSIDE the sewn line but near to it, nearly done,, put the hoop back in position again and hit the go button, the finall sew lines will do a satin stich all the way around the case. this wil give it that nice professional touch,
ok the machine has stopped,, remove the hoop and then release the stabaliser and tear it away from the fabric your spectacle case is completed,
Ok i may have misses out a couple of steps according to your chosen design but this is what basicaly happens,,, read the instructions through at least twice before you begin,,, test it out on some scrap fabric first to get the feel and understand the instructions
from purses to toys ID cases to babies bibs all are now at your fingertips.
I hope you enjoy useing this method of sewing,,
hoop but i will try to explain
In the hoop means as allready said an item made in the embroidery hoop that is used with an embroidery machine. the hoops come in several sizes according to your machine, these hoops can go from 2"x"2 up to a giga hoop but most hoops used for designs will be 4x4 5x7 7x10. ( not all machines do all sizes )
so lets look at what this entails
READ THE INSRUCTIONS
lets say you have purchased an in the hoop spectacle case. the first thing is you hoop up with iether a WSF or a Stitch and tear stabiliser this is almost like woven paper that carries your design on top of it, it is actually sewn to the item but can be ripped away when the item is finished. it holds the material in place as the hoop is moved around
ok we have hooped up your chosen stabalizer, and read all the instructions and cut the material needed start your machine,, it will sew out a placment line, you then place the first bit of fabric over this line and press go again
the fabric is sewn onto the stabiliser and then will stop, you may need to remove the hoop from the machine ( do not remove the fabric from the hoop) to cut away the excesse fabric from around the sewn line your instructions will need to be read as you go and each stage ticked off as you go if this is your first time... you may have to put on two layers of fabric at a time, one being the front and the other the linning,, just follow the instructions,
At one stage you may be asked to REMOVE THE HOOP FROM THE MACHINE DO ONLY THAT DO NOT REMOVE THE FABRIC FROM THE HOOP
now you need to place the linning and the back of the case UNDER THE HOOP i use childrens glue stick to hold the fabric in place, slide it back onto the machine and let the machine sew out its new oultline . this attaches the backing to the stabaliser,, again you may be asked to remove the hoop from the machine,, this time you will need to carefull remove the excesse materail from OUTSIDE the sewn line but near to it, nearly done,, put the hoop back in position again and hit the go button, the finall sew lines will do a satin stich all the way around the case. this wil give it that nice professional touch,
ok the machine has stopped,, remove the hoop and then release the stabaliser and tear it away from the fabric your spectacle case is completed,
Ok i may have misses out a couple of steps according to your chosen design but this is what basicaly happens,,, read the instructions through at least twice before you begin,,, test it out on some scrap fabric first to get the feel and understand the instructions
from purses to toys ID cases to babies bibs all are now at your fingertips.
I hope you enjoy useing this method of sewing,,
1 comment
Thank you. I totally get it. I have even made some Christmas ornaments similar to this. I made it up as I went along, I didn't know it had a name.