








109895✽
trying to ask? I am sure that would be challenging but possible.
Comments (10)

360672✽
yes it is just 2 squares then do as you have written .i sewed mine on the sewing machine then cut off the pieces before you turn it inside out,leave a 4 inch piece to turn it.
3 comments
I can't even finish mine by hand! I can't imagine doing it on the sewing machine.
Carol
Carol
it is just staight seams lol i found it easy i would love some more free designs!!carolyn
Thanks for the diagram. It does help me to know how it is done. I haven't tried it yet but Mops light blue fabric and pink flowers are just what I and my sister like, so I know I will be making at least 2 sets.

463490✽
This is some interesting information on the biscornu.
1 links:
[1]
http://www.prettyimpressivestuff.com/biscornu.htm
www.prettyimpressivestuff.com
4 comments

Thanks this is a very (to me) interesting site.
had a quick look at above link. sure is impressive! Thanks Sewmom

This is a great site to show you step by step how to put it together. Love the photo of the quality controller. Lyn

12165✽
Yep, that's how it's to be done. I'm having problems sewing mine together and had to redo it twice! I might just have to make it a square. Anyway, I just put it done to come and look at some of the pictures in projects and saw your post and thought I'd answer with "Help, what am I doing wrong?" I'll work on it again tonight.It is such a beautiful design and stitches out so good. Carol

211088✽
by
shirlener88
06 Mar 2011
+5✽
link:
1 links:
[1]
another great article
own-two-hands.livejournal.com
2 comments

Great link :)
this also has some hand stitching or cross stitching patterns.
360672✽
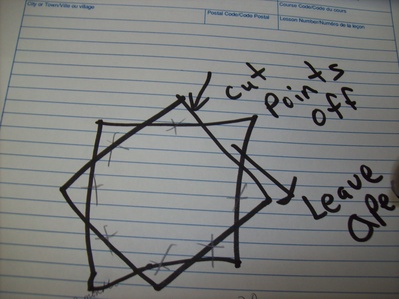
i drew a picture of how i sewed it on the sewing machine sew were my x's are ???Thanks carolyn
5 comments
Thanks for the pic Carolyn, makes it seem so much simpler, well for me anyhow, lol

Thanks for the picture, I didn't realize you cut the corners off. Mine would have been a mess, lol!
You don't cut off the corners! You start the corner of one in the middle of the side of the other square. Hope that helps! Suzanne
Sue i cut my corners off to make it more neat when turned right side out??Maybe i am doing them all wrong??But it works for me LOl carolyn
Oh my gosh! I think the light bulb just came on! Thank-you, thank-you!!!
Carol
Carol

234573✽
Thanks for asking - I don't think a lot of people knew that. I did, but it's great that the information is now up for people who didn't know. Love and blessings Chris

44905✽
by
dlonnahawkins
06 Mar 2011
+3✽
You certainly got some great instructions - I see where I was going wrong with the hand stitching now - and will know better the next time. I have made 3 so far - all different.

140726✽
For mine, I pinned the corner of one square to the centre of the side of the second square then turned it over and did the same again and then machine stitched round all but one of the sections. (Then turned it right way round, stuffed it and hand stitched the last bit.) I'm going to do another one and hand stitch it all from the outside to see if I can get a sharper finish.

48168✽
Aren't these fun to make? I also sewed mine by machine as Sue did and it worked nicely.

145307✽
I made a small cut in the seam in the middle of the squares and pinned the point to the middle of one side and sewed them from the middle to the point, lifted the foot, needle down, turned the material and stitched from that point to the middle of the next side, keeping the seams on top of each other, then wriggled the next section right and so on. Not difficult but let's call it fiddly. Worked fine for me.