











17488✽
me. It would be nice to edit the design and take the jumps out instead of having to stay at the machine to trim.
Thanks
Mary Ann
Comments (4)

122866✽
Yes there is, but first you need to figure out WHY there are jumps, are they avoidable, what will happen IF you remove them or what stitch are you going to change them into?
The reason there are jumps is usually because there is no other way to get from an ending of one segment to the beginning of another segment (of the same colour)
Sometimes this is totally UNAVOIDABLE,
Sometimes it is poor mapping by the digitiser.
So removing jump stitches easily is not always the best way to go.
Hugs and roses, Meganne
The reason there are jumps is usually because there is no other way to get from an ending of one segment to the beginning of another segment (of the same colour)
Sometimes this is totally UNAVOIDABLE,
Sometimes it is poor mapping by the digitiser.
So removing jump stitches easily is not always the best way to go.
Hugs and roses, Meganne
17488✽
Meganne, Thank you for the reply. Maybe I should have call them trims instead of jump stitches. I have several designs, that use the same color but as a sample..It might stitch black on a shoe, than it jumps to something else, and than another jump to something else leaving all these long threads in between that need to be trimmed. Is there a way to add a cut/trim into the design so it doesn't leave all these long threads behind to trim later? I know in my old software I could add a trims to the designs to avoid all the long threads.
Thank You
Mary Ann
Thank You
Mary Ann
122866✽
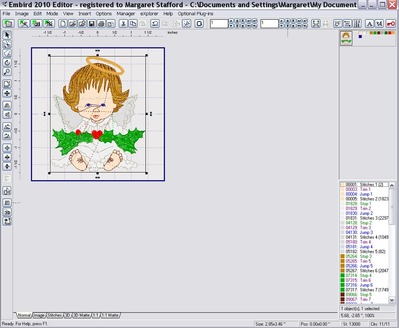
Click on each of the photo's below and it should open them in a new page so you can zoom in to see them better....
Open your design and make sure it is selected.
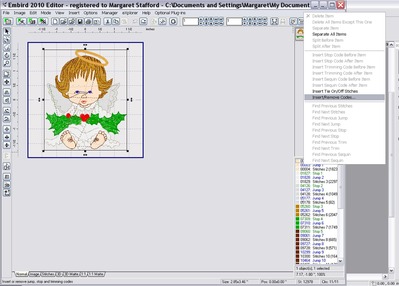
Right click in the bottom right panel, on the first jump stitch if necessary. Photo 1 and select INSERT/REMOVE CODES
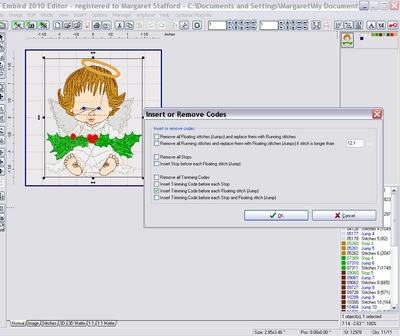
PHOTO 2, Scroll down and select whichever code is appropriate, in this case: Insert trim code before all floating stitches.
photo3 shows result of changes.
Now I DON'T know how successfull this is because it made no obvious change to the design, so you would have to stitch it out to see if it works.
Hugs n roses, Meganne
Open your design and make sure it is selected.
Right click in the bottom right panel, on the first jump stitch if necessary. Photo 1 and select INSERT/REMOVE CODES
PHOTO 2, Scroll down and select whichever code is appropriate, in this case: Insert trim code before all floating stitches.
photo3 shows result of changes.
Now I DON'T know how successfull this is because it made no obvious change to the design, so you would have to stitch it out to see if it works.
Hugs n roses, Meganne
2 comments

It works OK, I used it a number of times as the Ruby can cut/trim jump stitches but only if there are trimming codes in the design.
Thank you so much for the info.
I will give it a try next week, when I have a little time to work with it.
Mary Ann
I will give it a try next week, when I have a little time to work with it.
Mary Ann

62461✽
Can you turn off the function on you sewing machine? I do that with mine because I don't like all of those threads on the back. So I trim them after completed. It is nice that you don't have the top to trim later. But I guess you can't have everything!