





18960✽
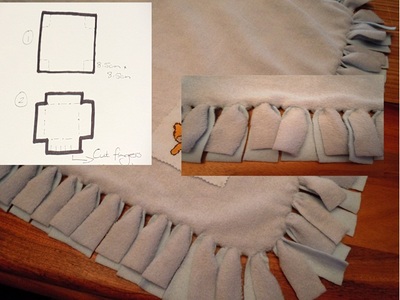
Yes tippi you use fleec material for this in 2 diff colours. 1m x 1m or 1.5m x 1.5m. Lay on top of each other with wrong sides together and the fleece with pattern/embroidery on the bottom. Dont stretch fleece but "brush" it and work on flat surface. Cut corners 8.5cm x 8.5cm and then 7.5cm "fingers", cutting from both sides. Fold all fingers over and make a VERY SMALL cut right on fold(should go through both layers.) Put fingers back. Take top finger and pull through little hole. Take finger that is now on top, look for the little hole in bottom finger and pull through. AND THERE YOU ARE.
1 replies to this comment
by marthie 10 minutes ago
Hope my explanation is satisfactory.
Reply to this comment
1 images:
[1]
Comments (20)

89895✽
What a unique technique. Like the no sew idea. Thanks for the tutorial.

140726✽

29648✽

2008✽
Well I'm a little confused. Can you help? Is the top finger pulled through the slit on the top one. And then the top pulled through the slit on the bottom? Or is it top through bottom and then bottom through top. I don't understand enough to make a sensible question!!! Sorry.
1 comment
You pull the tip finger through the little hole in the bottom finger. Now the bottom finger becomes the top finger. Do the same with the new top finger - pull it through the little hole in the "new" bottom finger. Better explained?

119791✽
115786✽

15907✽
Dankie vriendin, gaan sommer klomp maak. Thank you my friend, going to make a few.
Hugs
Marietta
Hugs
Marietta

7925✽

23222✽
9888✽
Neat idea! Not sure I completly understand but I'll bet it would be a fun finish. Thanks for the explanation!

19452✽
If I am understanding this, do you full the finger of one side through the slit of the other side, and then vice versa?
1 comment
BY the way, this is so clever if there is now sewing but only cutting and pulling through! Of course, you did mention embroidery on one of the sides.

255066✽
Marthie - I love this. The next time I see you I think I need some lessons. Have a wonderful time in Birmingham. Hugs Sarah.
18960✽
i will take photos of the steps and post it tonight.
2 comments
I am going to do all the cut work on fleece and take it with me on the plane. I cant sleep during a flight so this will keep me busy
Can wait to see......

48168✽
I think this is neater. I have seen them tied and it was bulky. This is much neater.

211088✽
by
shirlener88
06 Aug 2011
+2✽
Nice job - but I still can't figure what you do with the fingers and the cuts. I have to really see it - to understand - I guess. I know it must be so simple - but so is my mind.....
1 comment
I can't quite get the gist either. It does look great though.

25510✽
This is a different concept. How does it hold up in the wash?
5431✽
by
clintonmiss22
07 Aug 2011
+2✽
I like this technique. Looks like it lays so much flatter than the tied version. Thanks for explaining. We have a new GD due this month, so I better get busy. :-)
5046✽
Good idea!! I didn't really care for the knots on the tied blankets.

132773✽

6803✽
by
bnilla9241
08 Aug 2011
+1✽
Thank you, I do a lot of these blankets as gifts. I did not know how to turn it so the knots don't show.
Bonnie
Bonnie