




18960✽
Blessing Blanket - instructions. Some Cuties wanted to know more about this and I hope that the pictures make it more clearly and understandable.
Comments (12)
18960✽
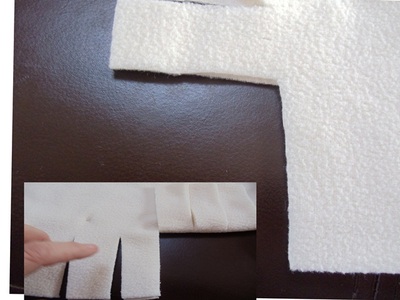
Pic 1: Cut the corners 8.5cm x 8.5cm
Cut "fingers" 7.5cm deep, from both sides to
middle
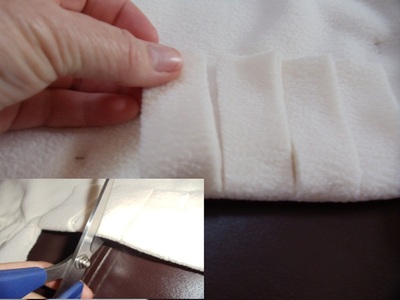
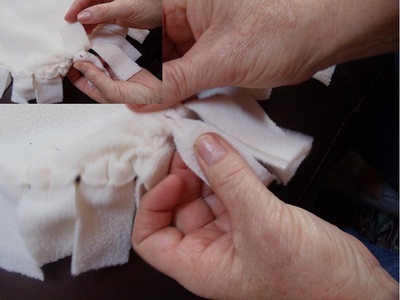
Pic 2: Pin fleece together and fold fingers over.
Put scissor "deep" into finger and give
very small cut
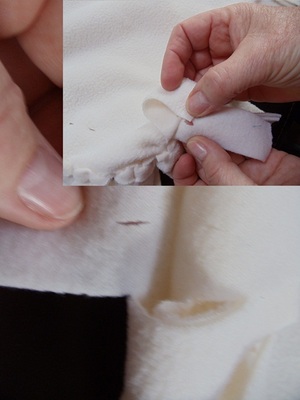
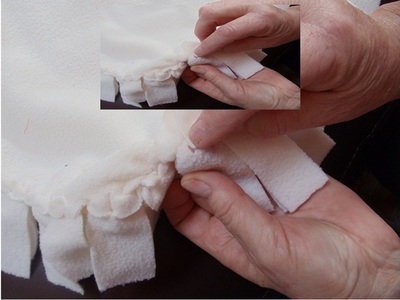
Pic 3: Fold fingers back and pull top finger
through little hole on bottom finger
Pic 4: Just show you top finger becomes bottom finger
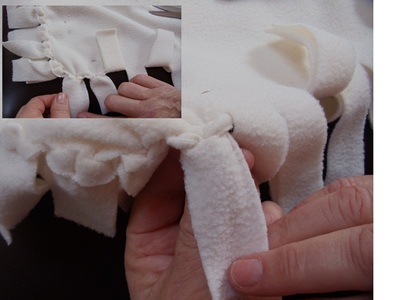
Pic 5: Pull new top finger through bottom finger
Pic 6: Pull nicely and there you have the perfect corner as well.
You are going to work with contrasting colours!!!! Remember wrong sides together and what would be the back of your blanket, will be on top while working AND do not pull to fleece, just brush
I hope to see some of your blankets coming week.
Cut "fingers" 7.5cm deep, from both sides to
middle
Pic 2: Pin fleece together and fold fingers over.
Put scissor "deep" into finger and give
very small cut
Pic 3: Fold fingers back and pull top finger
through little hole on bottom finger
Pic 4: Just show you top finger becomes bottom finger
Pic 5: Pull new top finger through bottom finger
Pic 6: Pull nicely and there you have the perfect corner as well.
You are going to work with contrasting colours!!!! Remember wrong sides together and what would be the back of your blanket, will be on top while working AND do not pull to fleece, just brush
I hope to see some of your blankets coming week.
2 comments

Thank you Marthie for all your amazing pictures. It now makes sense. Have a wonderful time in the UK. Love Sarah.
great photo's.

6356✽

360672✽
wow Marthie it is now clear as mud lol hugscarolyn
4 comments
My pleasure. My sister is bring her material to me so I can do the blanket on the plane. I am leaving for the UK tomorrow evening.
Are you cutting before you leave - or will you have access to a pair of scissors? There are so many things not allowed - I want to carry a ball of crochet cotton and ?one crochet hook but am wary of doing so.
Enjoy your trip Hugs Elizabeth
Enjoy your trip Hugs Elizabeth

I carried my hook on plane . There was no problem.

Noah, love that expression, I will have to make it mine now...LOL!!!

48168✽

211088✽
by
shirlener88
07 Aug 2011
+3✽
Thank you very much Marthie - this is so much easier to understand how to do this now. I appreciate the time it took to make this tutorial for us. Hugs!
12414✽
by
christracey
08 Aug 2011
+4✽
Thanks Marthie I hope I can understand this better now, I will have to try it & see....lol

11700✽
Many thanks for these very easy to understand instructions. It makes a beautiful finish to the blanket.

20463✽
10013✽
Thank you Marthie. I saved the directions to be able to make one in the future.
Lori
Lori
18960✽
Thank you MUFLOTEX. Here is a link that I found on the inhttp://www.projectlinus.org/patterns/pdf/NoSewFB.pdfternet. I think the Cuties in the USA know about the Linus projects
1 comment
quilters in Germany know the Linus project too, and lots of us support the officials with blankets for children locally. ;-) Ty for the link

92391✽
I recently went to Pittsburgh, Pa. Flew, and carried my afghan crochet hook and told them what it was and they said "No Problem" and I kept it on the plane with me. Hugs, Judy

132773✽