



78119✽
Mops 350x350mm outline doily with Sue Box Christmas stars. Thank you Martine for digitizing the beautiful border and Glenda (sqdancer) for her instructions on how to split a large design.
1 images:
[1]

Comments (24)

23222✽
Beautiful!!!!! Just beautiful!!
3 comments
Thank you, Ramona!
I just had to take another look. It is sooo pretty lidiad. Wish I had one made for my table.
What is the size of your largest hoop, Ramona? You might be able to stitch this doily in four hoopings, as per instructions given by Glenda (sqdancer).

23163✽
by
greysewist
17 Nov 2011
+7✽
That looks absolutely fabulous. Well done to all for a great joint effort!
1 comment
Thank you!
343✽

70767✽
this is beautiful.. great work
1 comment
Thank you!

89895✽
Your doily is beautiful with the damask fabric you used.
1 comment
Thank you!!!

72397✽
very nice great job
1 comment
Thank you, DeVon!

360672✽
excellent!!! I need to learn how to do this were would i get the instruction please??hugs carolyn
8 comments
Thank you, Carolyn! Send a PM (private message)from the Community page to Glenda, typing sqdancer when prompted, and your message. Also, in Community page, enter a message to her saying that she has a PM.
Do you have Embird or some other software that allows you to split designs? I have used Mops border with 12 scallops and have split it manually in Embird.
Hugs, Lidia.
no i have 5d from husqvarna don't even know if i can do it but it says on the files i can ,i just want to learn soooooooon i hope hugs carolyn
Me too I am so not very adventurous!
I would suggest to buy Embird basic plus the Iconizer module. It's not expensive and it's easy to use. I have 4D Embroidery Extra which I use sometimes but Embird is the one I use every day.
P.S.: I have used 4D to create the 6-star centre of the doily. Very easy!
5D let you do it easily, as does Embird. I tried it in both as my hoop isn't big enough either.

211086✽

24342✽
this is just lovely..was it hard to split?
1 comment
No, it was easy to split. The hard part was to stitch the second part accurately close to the first part. Also, the preparation work is essential for getting a good result.

27683✽
Just beautiful. I like the fabric you used
1 comment
Thank you!

119791✽

54619✽
Sieht ganz toll aus
1 comment
I suppose that you like it and I thank you!

145307✽
Lovely!!
Splitting designs is easy in Embird and in 3D, 4D or 5D. I did in 5D and in Embird to compare them and have no preference. The Encore function in 3D-5D is easier than in Embird as you can adjust the width of your circle, but it works well in both.
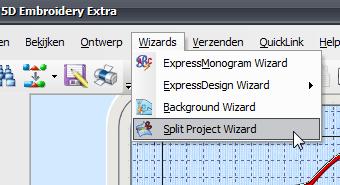
Here's how to split in 5D Embroidery Extra.
First open your design in a hoop for which you set the size your design fits in - can be anything as large as you want. Then choose Wizards. picture#1
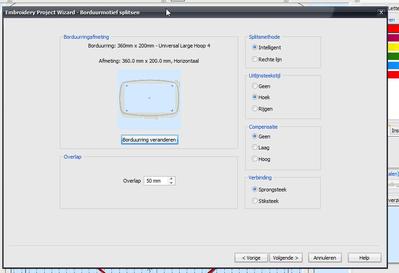
The Wizards opens and you are asked to set the hoop size of your largest hoop - I chose 200x360 in this case and horizontal as the seemed the way to split it. I further choose: straight line, alignment stitches in the corner, and set the overlap to the minimum setting. Picture #2.
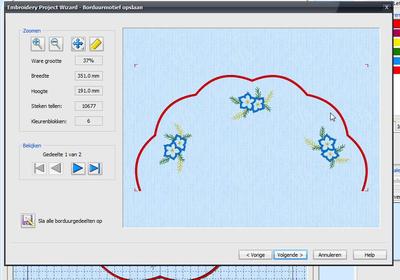
The wizard then shows how it splits the design, if you're satisfied save it (if not go back and try again with slightly different settings). Easy as pie!
Splitting designs is easy in Embird and in 3D, 4D or 5D. I did in 5D and in Embird to compare them and have no preference. The Encore function in 3D-5D is easier than in Embird as you can adjust the width of your circle, but it works well in both.
Here's how to split in 5D Embroidery Extra.
First open your design in a hoop for which you set the size your design fits in - can be anything as large as you want. Then choose Wizards. picture#1
The Wizards opens and you are asked to set the hoop size of your largest hoop - I chose 200x360 in this case and horizontal as the seemed the way to split it. I further choose: straight line, alignment stitches in the corner, and set the overlap to the minimum setting. Picture #2.
The wizard then shows how it splits the design, if you're satisfied save it (if not go back and try again with slightly different settings). Easy as pie!
4 comments
Wow! Martine, thank you for the tutorial! I just checked if I could do the same in 4DExtra, but it doesn't seem likely. Maybe I have to upgrade to 4DExtra. I'll post a print-screen of 4DExtra.
I meant to write: Maybe I have to upgrade to 5DExtra.
I could split in 3D as well, no wizard, but it was easy enough. I skipped the 4D so I don't know about that. Try the help-function if it's not in your manual. It is in the 5D manual, but I only noticed after I had uploaded this.
Thanks very much ladies hugs carolyn
78119✽
Below is a PrintScreen of my 4DExtra. It does not have the Split Project Wizard, unfortunately. The Encore function is wonderful and I have used it many times. Thank you for your help, Martine!
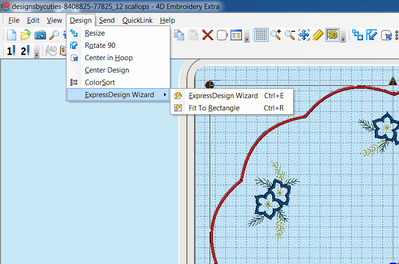
1 comment
I see. 3D had a separate Design Splitter module in the Pro Suite. 5D has it integrated in Embroidery Extra. Sorry to hear your 4D Emb Extra does not have it.

48168✽
This is just lovely.
1 comment
Thank you!

29648✽
21593✽

25745✽
This is so lovely
1 comment
Thank you, Sigrun!

25169✽
7384✽
This is so lovely! I would love to try it as I have never split a design before. May I ask where to find the link for this large doily design? Thank you!
3 comments
Thank you! Here is the link for this 12-scallop doily border: http://designsbycuties.cuteembroidery.com/8408825_bunbasket-improved-version-realised-sewing.html. And here is the link for the 16-scallop doily border: http://designsbycuties.cuteembroidery.com/8408430_bunbasket-sqdancer-asked-enlarge-design.html. Have fun!
I try again: designsbycuties.cuteembroidery.com/8408430_bunbasket-sqdancer-asked-enlarge-design.html
and: designsbycuties.cuteembroidery.com/8408825_bunbasket-improved-version-realised-sewing.html

27071✽
Lidia you did a beautiful job, glad you were able to work with what I sent you...Hugs Glenda x0x0x0
1 comment
Thank you very much for your invaluable help! I couldn't have made it without your instructions!
318615✽
by
dragonflyer
18 Nov 2011
+2✽
Anyone know if you split in Basic Embird program, do you just use the Freehand Select Mode and divide the design, then save as separated? When you put back together to sew out, do you have to overlap slightly to get smooth satin finish? Or how do you split in Embird? Thanks...
5 comments
I have split the design in basic Embird: first select the hoop size to be 350x360mm and used the Freehand Select mode to separate the design in two halves. I have saved each half using the Save Selected As tool. I did not overlap, just been careful when starting stitching the second half of the border.
just been careful matching the two sides before stitching the second half. Printing a template of the whole doily is essential. I suggest to ask Glenda (sqdancer) for her instructions, they will help you!
I have selected the 350x360 hoop size because I wanted to include the Star designs in the centre of the doily, so when I split the doily, the stars were included.
Thanks for the tips..and I will take your advise and will ask sqdancer for her splitting instructions...your doily is beautiful!
Thank you! Glad to be of help!

11700✽
Looks lovely. You must be feeling very pleased with the result. Great work.
1 comment
Thank you!
78119✽
To the Top for the cuties who like to read the instructions given here.