



Community / Embroidery /
14995
by eggyannie 15 Apr 2012 ( edited Apr 18'12 07:07 )
+58

TIP FOR LABELS

many of us would love some personalised iron on tags for our craft items but the price is a little too much. So lets make them oursleves.
If you have a design program for your computer then it is easy to do, better still if you have a business card creator.
create the business card as normal but and this is a BIG BUT print onto fabric. You can purchase on line or make your own.
these can then be taken off the paper backing once printed and then fusable webbing ironed onto the reverse. now when you want to put your own mark on that gift or craft item all you need do is cut out block and iron fuse it in place.
use clip art and fancy font to produce something that is just you. buy the printable fabric sheets and that way you can get a lot more for your money
If all you want is a "made by grandma "or similar then make a short line of print that will fit onto a ribbon strip of about half inch or more wide that is your choice.
create the line then revers or mirror image it, next copy and paste till you fill the page with the wording. print this off. Now all you need to do is take the sheet of paper to a printer who does laser printing and ask them to print a few pages for you.
purchase some white plain ribbon wide enough to take the print. next you will need your ironing board and some parchment paper and a dry iron, not steam, set to the hottest temperature that your ribbon will take . cut out one line of the print and place it face down on the ribbon leaving enough each end to allow for sewing on. place the parchment paper over the ribbon and the paper and PRESS DOWN. do not move the iron from side to side, just lift and press if the strip is longer than the iron. your iron needs to be as hot as the ribbon can take, hold the iron in place for about 5 seconds. allow the entire to cool so that you do not burn your fingers and then lift one end of the paper to check that the print has been transfered to the ribbon. if not then carefully let the end lie flat and again press with the hot iron for a little longer, you will soon find out how long you need to hold the heat on the print to melt the toner onto the ribbon.
now all you do is sew it in place iether as a loop in a seam or along all edges
if you are makeing towels then this can be used for hanging them if the ribbon is long enough.
have fun and save money
annie in the uk

Comments (21)
7314
by berny 15 Apr 2012
+9
Thank you will try...
115778
by asterixsew 15 Apr 2012
+7
Annie, as ever you have given us a brilliant idea. Thanks for sharing with us. Have you made up the fabrics you got at the NEC last month yet?
1 comment
by eggyannie 15 Apr 2012
not all of it but will be working on more this week. have decided to do some cat door stops and test out Ebay with them. plus make a few credit card holders for a raffle prize. will you be going to the malvern quilt show next month?
14995
by eggyannie 15 Apr 2012
+7
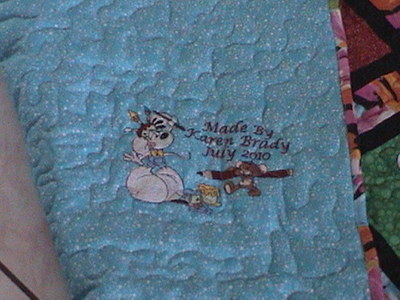
If you are very crafty then use a quilt label and add your name useing your embroidery program and then print out the design, scan and copy into microsoft word and duplicate that so you have several on one page and again print onto fabric. try doing one in cross stitch for a funky looking label
16529
by vickiannette 15 Apr 2012
+9
Hi Annie, I am keen to try the lazer print one. I have done the first one that you described and it was successful, but I found it very difficult to sew the special print fabric by hand -so stiff.
1 comment
by eggyannie 16 Apr 2012
can't understand why this should be as all mine havbe been very soft. try swilling it through after it has been printed to remove any fixer plus you do noteed to remove the backing paper as well
23163
by greysewist 16 Apr 2012
+8
Good thinking, Annie. You're so full of useful information!
420
by keelylynn 16 Apr 2012
+6
Thank you ... very good idea !
211079
by shirlener88 16 Apr 2012
+4
Thanks Annie.
25531
by obaachan 16 Apr 2012
+5
WOW !!! What a great idea !!! Thanks !
109774
by crafter2243 16 Apr 2012
+5
All those are very good ideas. Thank you Annie
173695
by cfidl 16 Apr 2012
+5
Thank you for the tips! I just got some of that printer fabric. Did you mention making your own? and how would that be done? Thanks again, christine LLDS!
2 comments
by eggyannie 16 Apr 2012
http://answers.cuteembroidery.com/7961205/been-Want-save-money-printable-fabric.html
by eggyannie 16 Apr 2012
http://answers.cuteembroidery.com/7961205/been-Want-save-money-printable-fabric.html
255054
by airyfairy 16 Apr 2012
+5
Annie - you always have the most wonderful ideas. Thank you. Sarah.
6734
by kryztyna 16 Apr 2012
+5
Thank you. Great ideas. Please let us know how to make printer fabric ?? That would be magic
1 comment
by eggyannie 16 Apr 2012
http://answers.cuteembroidery.com/7961205/been-Want-save-money-printable-fabric.html
48168
by rmj8939 16 Apr 2012
+4
Thank you for this great idea Annie.
17161
by bikermomfl 16 Apr 2012
+4
I always embroider a label on the back of every quilt I make before quilting, isn't he great our wonderful Diddl!
70914
by jacquipaul 17 Apr 2012
+5
Thanks for posting.
38558
by blueeyedblonde 17 Apr 2012
+5
Very interesting. I have printed the info for later use. Thanks.
13250
by momhome 17 Apr 2012
+4
Thank-you. I too have copied over so that I have a future reference. All you cuties have such wonderful ideas and tips. Thanks.
16707
by tilde01 18 Apr 2012
+2
Thanks for this info. I'm also copying it for future use.
19439
by cj2sew 18 Apr 2012
+2
Good info. You seem like a lady who tries everything and nothing is to hard for you.
1315
by dany2011 18 Apr 2012
+2
Thanks for this info.
132773
by castelyn 18 Apr 2012
+1
Annie, thanks so much for this. But I must ask what is "parchment paper" please.

Will have to try this out.

Hugs Yvonne
1 comment
by eggyannie 18 Apr 2012
parchment or baking paper that you put on a baking tray to stop the goodie from sticking