







Community / Embroidery /
29801
by mi30kaja 19 May 2012 ( edited Jun 18'12 17:12 )
+73

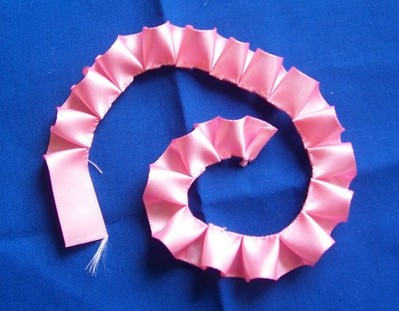
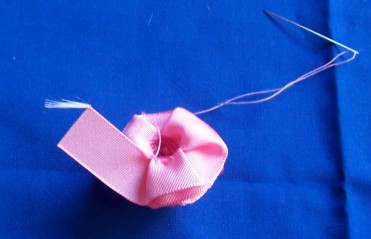
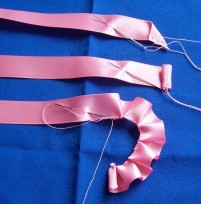
This is just a rough outline of making the Box Pleat roses. I am using Polyester ribbon 16mm( almost .75 of an inch) and 60mm ( almost 24 inches) long. Fold one edge over to make an angle. Stitch to secure so it doesn't fray. Roll this along the ribbon and this is the center of your rose. Then you make the box pleats about half an inch wide stitching the bottom as you go. When you finish all of these to go back to the beginning and roll the box pleats over and stitch again on the bottom as you go, keeping the bottom flat. Tidy the end of the ribbon over the stitching on the bottom of your flower. You can use any size ribbon and adjust the length accordingly.I find the ribbon with satin both sides is too hard to manage. My ribbon is satin one side only. Hope you can understand this. I find it easier to show someone than to explain. Lyn

Comments (35)
30656
by jerrib 19 May 2012
+13
Maybe someone could do a video of how you do this. Would be interesting to see.
1 comment
by mi30kaja 19 May 2012
Only wish You could all come to my place and then realise how easy they are. Might try to take some pics of the stages.
211079
by shirlener88 19 May 2012
+10
Lyn, great description and info on how to - can you attach some photo's of the progression of it, too? Iam very visual.
211079
by shirlener88 19 May 2012
+12
see it this is like what you described.
1 links:
[1] Box pleat roses
www.youtube.com
2 comments
by shirlener88 19 May 2012
on no!

I just went to you tube and put in Box Pleat Roses:
http://www.youtube.com/watch?v=j7hv3gZ9APo
by catsnhorses 19 May 2012
Shirlene - Wow! Thanks for the youtube tip. I found lots of instructions on making everything from ribbon rose buds to using box pleat trim to make the roses using just a glue gun. ... now to dig through my stash in hopes I have some of all of them to try. What fun! Thanks to you & Lyn.
29801
by mi30kaja 19 May 2012
+12
First 3 stages.
4 comments
by noah 19 May 2012
Wow this is soooooooo cool lyn hugs
by shirlener88 19 May 2012
Amazing - such great work - I so appreciate seeing it like this - thank you so very much.
by cfidl 19 May 2012
ttt
by momhome 20 May 2012
ttt
29801
by mi30kaja 19 May 2012
+10
Stage 4.
3 comments
by shirlener88 19 May 2012
Wow, this is lovely work. Thanks.
by cfidl 19 May 2012
ttt
by momhome 20 May 2012
ttt
29801
by mi30kaja 19 May 2012
+10
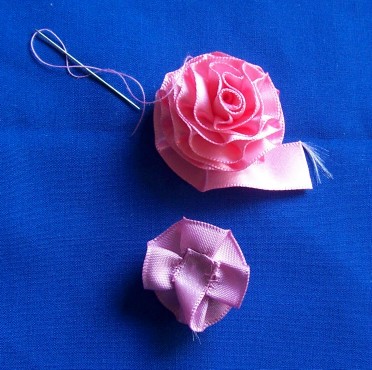
Stage 5. I have rolled the pleats and sewn them as I was rolling. Sometimes it will stay flat on the bottom. Think it is ther way you hold it but results are the same.
4 comments
by shirlener88 19 May 2012
Such neat work - thanks!
by cfidl 19 May 2012
ttt
by cfidl 19 May 2012
ttt
by momhome 20 May 2012
ttt
29801
by mi30kaja 19 May 2012
+11
Stage 6 and Finish. This is the rose almost finished. With the tail you just fold it over the stitching on the bottom to tidy it up. I found the smaller you make your pleats the more ruffled your rose will be. You will see by the small rose. The small one is stitched with more narrow ribbon 40 - 50mm long. I made mine 45. Hope you enjoy making these as much as I do. Lyn
4 comments
by shirlener88 19 May 2012
Such lovely work. THANK YOU so much Lyn!
by mariahail 19 May 2012
Beautiful!!!!!
by cfidl 19 May 2012
ttt
by momhome 20 May 2012
ttt
10333
by kitty2011 19 May 2012
+10
Good job... these are very pretty lyn., thanks for sharing
1 comment
by mi30kaja 19 May 2012
Hope you can make them.
4131
by janetedna 19 May 2012
+9
Very good tutorial, I thought you gathered the ribbon, this looks better. Smashing photos,great tip to use single sided satin ribbon. Thanks, Jan
1 comment
by mi30kaja 19 May 2012
I have tried the double sided satin ribbon and it slips and is too hard. The organza that I tried I unpicked it twice and then left the 3rd try. Won't make any more of these in Organza.
211079
by shirlener88 19 May 2012
+8
Lyn, thank you so very much - this is wonderful - I so appreciate the time that you took to make another rose and to take pictures and write up your comments for each.
2 comments
by mi30kaja 19 May 2012
You are most welcome. I am hoping others will make some roses and include them in Projects.
by bumblebee 19 May 2012
Shirlene What a preety thank you and I second that thought, very kind Lyn to make a pictorial.
211079
by shirlener88 19 May 2012
+10
in projects:
1 links:
[1] Lyn's Box Pleat Roses
projects.cuteembroidery.com
2 comments
by mi30kaja 19 May 2012
Thanks Shirlene.
by momhome 20 May 2012
ttt
537
by maltamaid 19 May 2012
+11
They look really beautiful. Thank you for instructions - Eileen
1 comment
by mi30kaja 19 May 2012
You are welcome.
537
by maltamaid 19 May 2012
+11
Is there anyway that I can either print off your pictures and instructions or else keep them in a file on my computer for future reference. Eileen
3 comments
by babsie 19 May 2012
Yes, First make a folder where you want to put it, right click the pictures and say "save as" in that file. Highlight the writing, copy and paste also there. Hope this help, that's the way I did it.
by mi30kaja 19 May 2012
Glad someone has told you how to keep this as I wouldn't have thought of this.
by maltamaid 19 May 2012
Thanks a million - will try later on - in a hurry right now. X
21222
by babsie 19 May 2012
+10
Thanks for sharing. I saved it for futher reference. Hugs.
1 comment
by mi30kaja 19 May 2012
Hpe you get to make some.
299559
by pldc 19 May 2012
+10
thanks excellent tutorial
1 comment
by mi30kaja 19 May 2012
You are welcome,
21543
by susiesembroidery 19 May 2012
+8
Thank you so much for the clear instructions, Lyn. I appreciate it and know that it takes more than a little effort. Hope you will be really appreciated for your hard work. They are lovely. Hope you get well soon.****
1 comment
by mi30kaja 19 May 2012
I am so bad at describing something so thought the photos would explain a little easier.
33079
by catsnhorses 19 May 2012
+7
OMGoodness, what wonderful photos with the instructions! I love these, and plan to make a bunch into corsages. You're the best, Lyn! Blessings to you to feel better soon.
Marion in Kentucky
1 comment
by mi30kaja 19 May 2012
Marion, I think you could make some beautiful ones for a corsage with a wider ribbon. Please let us see them if you do.
173695
by cfidl 19 May 2012
+6
Thank you for the instructions! Live Laugh Download Stitch!
1 comment
by mi30kaja 19 May 2012
You are welcome.
62461
by clawton 19 May 2012
+6
Thanks for the directions and especially the pictures.
1 comment
by mi30kaja 19 May 2012
You are welcome. Hope you can make some flowers.
67271
by bevintex 19 May 2012
+5
I noticed you can buy the ribbon already pleated,may cost a bit more but a nice timesaver.
2 comments
by mi30kaja 19 May 2012
That is cheating but then all of your pleats would be the same size which you can never do if you are doing it by hand.
by bevintex 20 May 2012
Cheating would be buying them already made
1648
by tracypullen 19 May 2012
+4
Thank you so much, I was wanting to make some of these roses and the box pleat ribbon cost an arm and a leg.
2 comments
by mi30kaja 20 May 2012
I didn't know you could even buy pleated ribbon, but this is Australia.
by tracypullen 20 May 2012
HotLanta GA LOL We have EVERYTHING you can imagine. which is sometimes not a good thing, if you know what I mean. My basement is crammed with junk. If one of my friends needs something odd, they call me.
29801
by mi30kaja 19 May 2012
+5
My Girlfriend does these a different way. She pleats as she goes, but I found them too hard to hold and pleat.
13250
by momhome 20 May 2012
+5
Beautiful roses. Thanks for the picture instructions.
1 comment
by mi30kaja 20 May 2012
You are welcome.
40397
by sewdoctor 20 May 2012
+5
Thank you for this...yours are beautiful!
5402
by suelyn7 20 May 2012
+5
thank you I have got to try this, they do look wonderful.
25510
by rsehorse 20 May 2012
+4
Wonderful instructions and pictures.
57801
by edithfarminer 18 Jun 2012
+5
Thank you so much for your instructions and pictures. They are beautiful and will try and make some one day soon
10333
by kitty2011 18 Jun 2012
+4
There you go... I knew someone had done these, I just couldn't remember who.
So glad someone found Lyns thread.
xx
7875
by bevgrift 18 Jun 2012
+4
Thanks ever so much for these fab pics with intructions. Your roses are lovely.
Hugs Bev
8230
by rachap 18 Jun 2012
+3
Thanks for the instructions and pictures. I tried once long ago to make these and mine looked like I had just wadded up a handful of ribbon!! Yours are so pretty,I think I will give them another try.
1 comment
by mi30kaja 19 Jun 2012
Don't forget to put them on here so we can see them.
5277
by sharonleekesner 18 Jun 2012
+3
You explained and pictured it, just wonderfully. Thank you for another fun and beautiful thing for me to maie with my granddaughter.
1 comment
by mi30kaja 19 Jun 2012
Hope to see your roses on Projects.
140717
by spendlove 18 Jun 2012
+3
You make it look so easy!
1 comment
by mi30kaja 19 Jun 2012
Sue that are easy. Because my machine is down I have been hand sewing and now have a hole on my finger.
38558
by blueeyedblonde 18 Jun 2012
+3
thanks for the instr. and pictures!
1 comment
by mi30kaja 19 Jun 2012
You are welcome.
11877
by bokkieborduur 18 Jun 2012
+3
Thanks, we are never to old to learn. Hugs Marie
1 comment
by mi30kaja 19 Jun 2012
I learn something almost every day.
33451
by marjialexa 18 Jun 2012
+3
Great tutorial! I've seen these, but never realised they were so simple to do, especially with the wider ribbon. Thanks so much for sharing your technique! Hugs, Marji
1 comment
by mi30kaja 19 Jun 2012
Thanks Marji.