





8038✽
Hi,
This a question for our experienced digitizers. How do you digitize a design to get the effect of a colourwash, that is where you blend different colours together so you have no clear idea where one colour stops and the next one starts (see the sunset sky on my water colour painting)?
In the sunset I used yellow, red, orange and a touch of blue and I diluted the colours with water, so the yellow is different shades of yellow. How do you get a similar effect in embroidery?
Hand embroidery is easy, you can blend short and long stitches in different shades.
Please help!
Thank you in advance.
Anneliese
1 images:
[1]

Comments (3)

145307✽
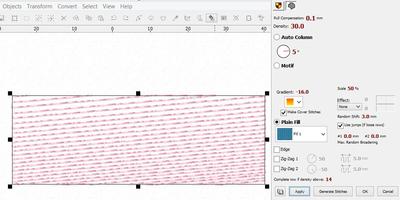
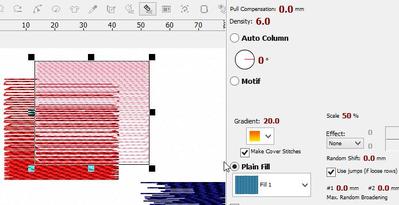
In the software you can set the density to variable - use gradient -and set a value for the most dense and the less dense parts and choose the type of gradient. When you choose the outside to be less dense than the middle, you can overlap two objects, giving f.i. a yellow and an orange part with a mixed area in between. The stitch direction in both parts is parallel. See the picture for possible settings.
A second way to do it is digitise two (touching) areas set the edges uneven, choose how much in mm, can be done both with fills as with columns with pattern. Choose just one edge or both. Here the stitch direction need to be perpendicular -less natural for skies, I think. Works great in flowers and as fur.
Or you do two touching areas and overlay the border area with a low density uneven shading bit.
And you could always decide to use the manual tool and set every stitch by hand or the outline tool and set lines. That way you "paint" by hand.
Choose the method that works best for the effect you want to create.
Both Embird and 6D let you do all methods and I think other brands would as well.
A second way to do it is digitise two (touching) areas set the edges uneven, choose how much in mm, can be done both with fills as with columns with pattern. Choose just one edge or both. Here the stitch direction need to be perpendicular -less natural for skies, I think. Works great in flowers and as fur.
Or you do two touching areas and overlay the border area with a low density uneven shading bit.
And you could always decide to use the manual tool and set every stitch by hand or the outline tool and set lines. That way you "paint" by hand.
Choose the method that works best for the effect you want to create.
Both Embird and 6D let you do all methods and I think other brands would as well.
2 comments

Cool!
Thank you very much for your clear explanation. I will definitely start to experiment!
145307✽
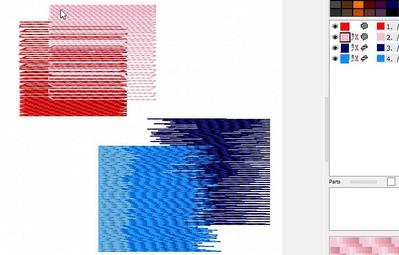
I could not resist playing with it a bit as well. See picture.
Here are the settings.
red D=20.0 Gradient= -14.0 fill1
pink D= 6.0 Gradient= 20.0
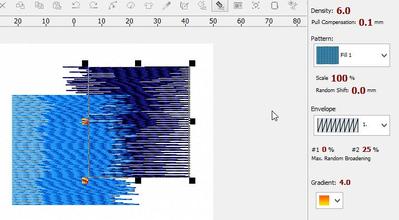
blue D= 6.0 Gradient= 4.0 column with pattern
max random broadening 1=0% 2=25%
light blue
D= 6.0 Gradient= 0
max random broadening 1=0% 2=25%
make sure you use no underlay or it will show in the less dense areas.
It stitches out much better than it looks in this picture as the top stitches sink between the lower ones.
I usually stitch out my tests and keep them in a folder, complete with settings, ready for reference.
Here are the settings.
red D=20.0 Gradient= -14.0 fill1
pink D= 6.0 Gradient= 20.0
blue D= 6.0 Gradient= 4.0 column with pattern
max random broadening 1=0% 2=25%
light blue
D= 6.0 Gradient= 0
max random broadening 1=0% 2=25%
make sure you use no underlay or it will show in the less dense areas.
It stitches out much better than it looks in this picture as the top stitches sink between the lower ones.
I usually stitch out my tests and keep them in a folder, complete with settings, ready for reference.
2 comments
What an awesome tutorial, Martine!!
Oh my, so much more than what I could wish for! Thank you so very much. This will really help me. Thank you very much for this little tutorial with pictures. It is going in a word document which will go under my Embird Tutorials. I love it when people share their knowledge and experience!

261163✽
by
basketkase
06 May 2014
+3✽
It is similar in Bernina, but different language........I wish they would all use a universal terminology........in Bernina it is called color blending but it doesn't use the column thingy........I usually do it all manually to have maximum control and I vary the length and space between the stitches.........you are so right, Martine, to not use an underlay and I will also tell the program to travel along the outline of design........
2 comments
6D has a different terminology as well. They have a feature that lets you set it in one go, just choose your colours and settings and Bob's your uncle.
I usually do it by hand as well, much more control.
I usually do it by hand as well, much more control.
Thank you. I am still too scared to create stitches by hand. That I will leave for a future date. But I will start doing it someday.